Flowers in Processing: Getting Started
Last week we held a workshop for students interested in getting started with Processing. I started a simple walk-through trying to show how I made the floating flowers on this website but didn’t finish it. This post is an attempt to explain it step by step.
What is Processing?
Processing is simple but powerful programming language and environment created for artists, designers and other non-programmers. It’s free software and it can be used to produce visuals very easily.
Examples of use
Processing is used in all sorts of projects and art pieces. Here are a few examples:
Five Filters (my own project)
Moving particles (JavaScript)
How can I use it?
The steps below are intended to get you started very quickly. You will download and run Processing and then use it to draw simple lines and shapes. The section that follows explains how to go further and create movement and slightly more interesting shapes — the flowers you see on this site.
Step 1: Download and Install
Download Processing (if you’re on Windows, stick with the regular download which includes Java) and extract into a folder. Find and run the processing file to open the environment.
Step 2: Draw a line
Copy and paste the two lines below into the Processing window.
size(400, 400);
line(100,100,300,300);
Your window will look like this:
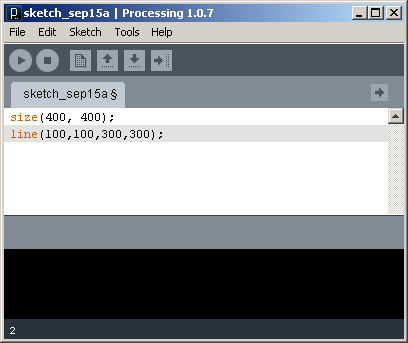
Click play (or select Sketch > Run) to see the output. It should look like the image below:
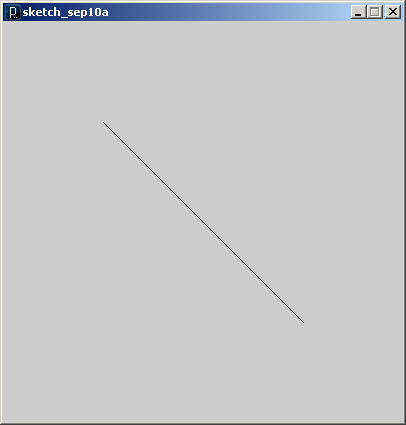
If the relationship between the numbers in the code and line in the output isn’t clear, read about the coordinate system used in Processing.
Step 3: Draw shapes
size(400, 400);
triangle(150, 50, 100, 100, 200, 100);
rect(100, 100, 100, 100);
ellipse(200, 200, 100, 100);
See Processing’s reference page for more information on these shape functions.
Going further: Drawing flowers
Because it’s easy to draw simple shapes in Processing, we’re going to draw our flower in stages, a little like this:

Step 1: Set canvas size, background and smoothing
Before we start it’s a good idea to tell Processing how big we want our canvas (or display window) to be. We do this with the size() function. It takes two values: width and height. In this walk-through we’ll create a 400×400 canvas.
To set the background colour we use the background() function. Here we’ll be using a white background (#ffffff).
Finally we tell Processing we want our edges to be smooth using the smooth() function.
size(400, 400);
background(#ffffff);
smooth();
Step 2: Draw a flower
Step 2.1: Draw the centre circle
To draw a circle we use the ellipse() function. It takes 4 values: the x coordinate, the y coordinate, the width and the height.
To centre our circle on our 400×400 canvas we have a number of options. We can pass it 200 for the x coordinate and 200 for the y coordinate. But we can also tell Processing that we’d like 0,0 to be our centre point (by default 0,0 is the top left corner). We’ll go for the second option as it’ll make it easier to draw the petals later on. For the last 2 values (width and height of the circle) we’ll pass 50 and 50.
To tell Processing to treat the centre point as 0,0 we use the translate function, passing it 200 for the x coordinate and 200 for the y coordinate — or simply width/2 and height/2 (width divided by 2 and height divided by 2).
size(400, 400);
background(#ffffff);
smooth();
// set centre point
translate(width/2, height/2);
// centre circle
ellipse(0, 0, 50, 50);
Step 2.2: Draw one petal
To draw the first petal, we’ll position it above the centre circle:
size(400, 400);
background(#ffffff);
smooth();
// set centre point
translate(width/2, height/2);
// centre circle
ellipse(0, 0, 50, 50);
// first petal
ellipse(0, -50, 50, 50);
The only difference with the second call to ellipse() is the second value (y coordinate). Instead of positioning it in the centre (0) we move it up 50 pixels (-50). Running this code will display 2 circles:
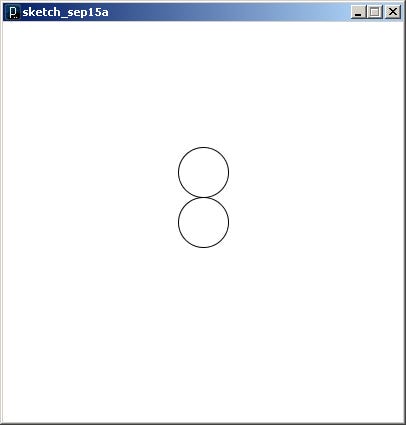
Step 2.3: Draw the rest of the petals
The easiest way to draw the other petals is to rotate the canvas and draw another circle. To do it we use the rotate() function — rotate() works with radians but if you prefer your angles in degrees, you can use the radians function to convert degrees to radians.
How rotate() works might be a little confusing at first. If you need more help, Till Nagel has an excellent tutorial on rotation in Processing.
size(400, 400);
background(#ffffff);
smooth();
// set centre point
translate(width/2, height/2);
// centre circle
ellipse(0, 0, 50, 50);
// first petal
ellipse(0, -50, 50, 50);
// second petal
// rotate 72 degrees
rotate(radians(72));
ellipse(0, -50, 50, 50);
// third petal
rotate(radians(72));
ellipse(0, -50, 50, 50);
// fourth petal
rotate(radians(72));
ellipse(0, -50, 50, 50);
// fifth petal
rotate(radians(72));
ellipse(0, -50, 50, 50);
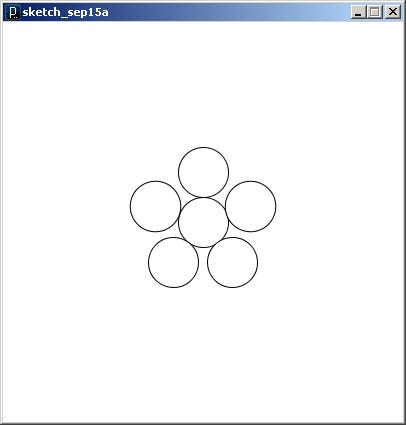
In the code above, after we’ve drawn the first petal we rotate 72 degrees and draw the next one. We keep doing this until we’ve drawn the fifth petal. Try changing the value from 72 to something else to see the effect. I reached 72 through trial and error, but the more mathematically minded might recognise that it’s simply 360 degrees divided by 5 (we’re drawing 5 petals): 360/5 = 72. If you were drawing 6 petals you could work out how much to rotate by dividing 360 by 6.
Step 3: Remove repetition and simplify the code
One of the advantages of using a programming language is you can avoid repeating yourself — in this case copying and pasting the same commands (rotate and draw). It would become very tedious if you wanted to create a flower with 100 small petals using the example above.
In the code below we introduce a for loop. We tell processing to run a piece of code 5 times.
size(400, 400);
background(#ffffff);
smooth();
// set centre point
translate(width/2, height/2);
// centre circle
ellipse(0, 0, 50, 50);
// draw 5 petals, rotating after each one
for (int i = 0; i < 5; i++) {
  ellipse(0, -50, 50, 50);
  rotate(radians(72));
}
We’ve shortened the code but the result is the same.
Step 4: Add colour
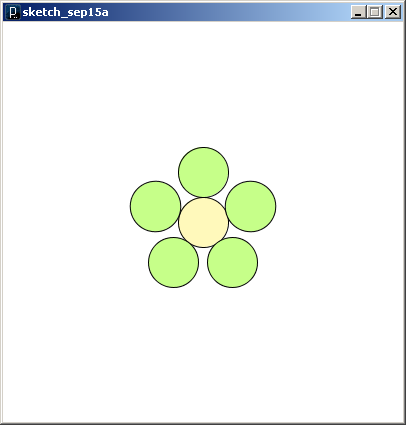
Each time a shape is drawn, a fill colour is applied (the default is white). We can draw each shape in a different colour by changing the fill colour before we draw the shape. To change the fill colour, use the fill() function. If you’ve got the Processing application open, you can find the colour values using the colour selector tool (Tools > Color Selector).
size(400, 400);
background(#ffffff);
smooth();
// set centre point
translate(width/2, height/2);
// centre circle
fill(#fff9bb); // light yellow
ellipse(0, 0, 50, 50);
// draw 5 petals, rotating after each one
fill(#c6ff89); // green
for (int i = 0; i < 5; i++) {
  ellipse(0, -50, 50, 50);
  rotate(radians(72));
}
Step 5: Getting closer to the sketch
Now our flower is beginning to look a little closer to the sketch earlier on, but if we compare the two we’ll see that in the sketch the petals are much closer together and slightly overlapped by the centre circle.
To create the same effect in Processing we can reduce the distance between the centre circle and the surrounding petals. The value we need to change is the -50 y coordinate. Try changing the value and running the code again to see the effects. -40 works well for me.
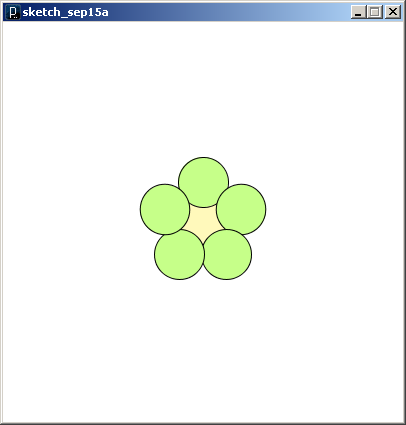
The problem now is that the petals overlap the centre circle. To fix that we need to rearrange our code so that the centre circle is drawn last:
size(400, 400);
background(#ffffff);
smooth();
// set centre point
translate(width/2, height/2);
// draw 5 petals, rotating after each one
fill(#c6ff89); // green
for (int i = 0; i < 5; i++) {
  ellipse(0, -40, 50, 50);
  rotate(radians(72));
}
// centre circle
fill(#fff9bb); // light yellow
ellipse(0, 0, 50, 50);
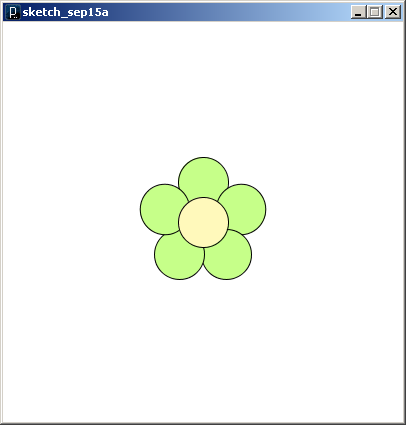
Our flower is now looking very close to the sketch.
Step 6: Remove the outline
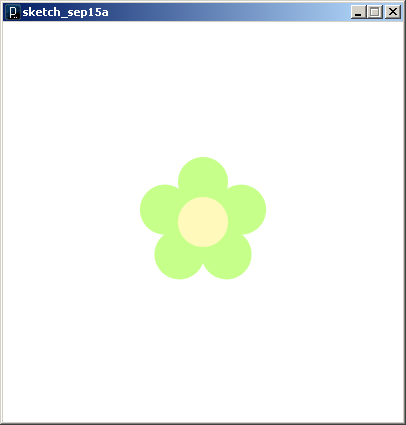
Removing the black outline is done with the noStroke() function. We simply call it before we start drawing:
size(400, 400);
background(#ffffff);
smooth();
noStroke();
// set centre point
translate(width/2, height/2);
// draw 5 petals, rotating after each one
fill(#c6ff89); // green
for (int i = 0; i < 5; i++) {
  ellipse(0, -40, 50, 50);
  rotate(radians(72));
}
// centre circle
fill(#fff9bb); // light yellow
ellipse(0, 0, 50, 50);
Step 7: Animate
Up to now the code we’ve written has been used to create static images — Processing draws the shapes and stops processing. To create movement we need to break our code into two parts: setup and draw.
Setup contains the code that we’d like Processing to run just once at the beginning (e.g. setting the size of the canvas). Draw contains the code that we’d like Processing to run continuously — in a loop. These are the two main blocks that you usually start with when creating a Processing sketch involving animation or interaction.
Step 7.1: Split code into draw and setup
void setup() {
  size(400, 400);
  smooth();
  noStroke();
}

void draw() {
  background(#ffffff);
  // set centre point
  translate(width/2, height/2);
  // draw 5 petals, rotating after each one
  fill(#c6ff89); // green
  for (int i = 0; i < 5; i++) {
    ellipse(0, -40, 50, 50);
    rotate(radians(72));
  }
  // centre circle
  fill(#fff9bb); // light yellow
  ellipse(0, 0, 50, 50);
}
Running this code will produce the same result as before but behind the scenes Processing is actually continuously running the code within the draw() block — drawing the flower again and again. We don’t see it because each time it’s being drawn on top of itself.
Step 7.2: Slow rotation
Now we’re going to animate our flower by making it rotate slowly. To do this we’ll use the rotate() function again but this time we need to use a number that keeps increasing — we can’t use rotate() with a fixed number as we did before because when all the code in draw() is executed the rotation is reset. Luckily Processing offers a variable that increases every time draw() is run: frameCount. The first time draw() runs frameCount holds the number 1, the second time it will be 2, then 3 and so on. We can use this variable to rotate a little more in each frame.
void setup() {
  size(400, 400);
  smooth();
  noStroke();
}

void draw() {
  background(#ffffff);
  // set centre point
  translate(width/2, height/2);
  // rotate canvas using frame count
  rotate(radians(frameCount));
  // draw 5 petals, rotating after each one
  fill(#c6ff89); // green
  for (int i = 0; i < 5; i++) {
    ellipse(0, -40, 50, 50);
    rotate(radians(72));
  }
  // centre circle
  fill(#fff9bb); // light yellow
  ellipse(0, 0, 50, 50);
}
Now if we run this code we should see the flower rotating.
Step 7.3: Add frame rate
To control how fast the animation runs we can set a frame rate. Here we set the frame rate to 15, meaning draw() will be executed 15 times a second, so our flower will be rotating 15 steps each second.
void setup() {
  size(400, 400);
  smooth();
  noStroke();
  frameRate(15);
}

void draw() {
  background(#ffffff);
  // set centre point
  translate(width/2, height/2);
  // rotate canvas using frame count
  rotate(radians(frameCount));
  // draw 5 petals, rotating after each one
  fill(#c6ff89); // green
  for (int i = 0; i < 5; i++) {
    ellipse(0, -40, 50, 50);
    rotate(radians(72));
  }
  // centre circle
  fill(#fff9bb); // light yellow
  ellipse(0, 0, 50, 50);
}
Step 8: Follow the mouse
Finally we’re going to make the flower follow the mouse cursor and adjust rotation based on the position of the cursor. Here we use mouseX and mouseY to access the position of the mouse.
void setup() {
  size(400, 400);
  smooth();
  noStroke();
  frameRate(15);
}

void draw() {
  background(#ffffff);
  // set centre point
  translate(mouseX, mouseY);
  // rotate canvas using frame count and mouse position
  rotate(radians(frameCount + mouseX));
  // draw 5 petals, rotating after each one
  fill(#c6ff89); // green
  for (int i = 0; i < 5; i++) {
    ellipse(0, -40, 50, 50);
    rotate(radians(72));
  }
  // centre circle
  fill(#fff9bb); // light yellow
  ellipse(0, 0, 50, 50);
}
Further reading
There’s a lot of information on the Processing website, including tutorials and books that go into more detail. The getting started guide on the Processing site also covers quite a lot more than I’ve done here.
